憨憨呆呆的IT之旅

我见,我思,我行

今天需要将Mysql数据从RDS迁移到ECS云服务器上自建Mysql中。因我的RDS已到期停机,无法通过mysqldump等命令导出数据,好在RDS给提供了数据库物理文件的每日全量备份,姑且用之。
整个操作流程可分为三个:下载解压物理文件备份, 使用Percona XtraBackup恢复数据,启动MySQL并校验数据。

下载解压备份文件

在RDS的备份恢复界面找到最新备份:

1579445856935

获取下载地址并使用wget或curl下载到ECS机器上。下载得到的是一个tar.gz压缩包,使用如下命令解压缩:

1
2
3
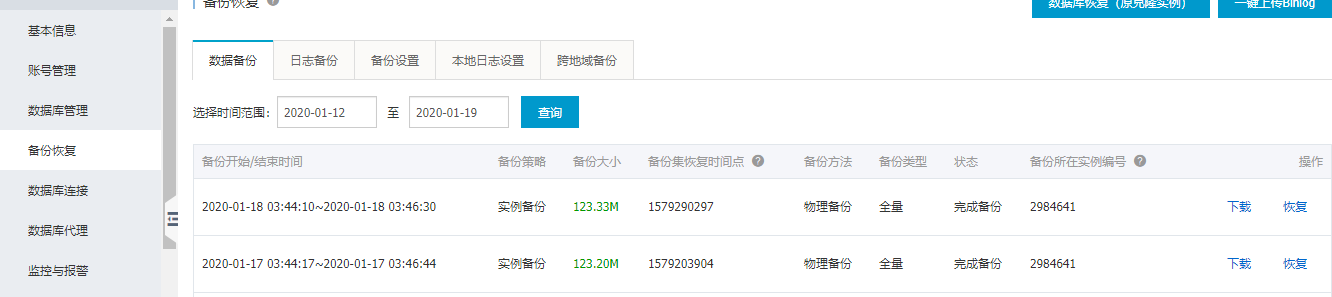
tar -izxvf '<backup_file_name.tar.gz>' -C '<MySQL data dir>'
# for example,my command is:
# tar -izxvf /mnt/backup_data/db_backup/rds_data_20200118.tar.gz -C /var/lib/mysql

这里我直接解压到了默认的MySQL数据目录/var/lib/mysql.(我的MySQL是新装的,还没启动,因此默认数据目录下是空的)。

使用Percona XtraBackup恢复数据

首先,需要安装Percona XtraBackup。这里需要注意,不同的MySQL版本,需要不同的Percona XtraBackup版本。比如,MySQL 5.6及之前的版本需要安装 Percona XtraBackup 2.3,MySQL 5.7版本需要安装 Percona XtraBackup 2.4,MySQL 8.0版本需要安装 Percona XtraBackup 8.0
安装完毕后,执行如下命令,恢复解压后的文件:

1
innobackupex --defaults-file=/var/lib/mysql/backup-my.cnf --apply-log /var/lib/mysql

若恢复成功,则会提示类似文字:

恢复成功提示

启动MySQL并校验数据

设置正确的文件属主:

1
chown -R mysql:mysql /var/lib/mysql

执行如下命令启动mysql:

1
service mysql restart

使用各种客户端软件连接MySQL,根据业务情况校验各数据库、各表的数据。

参考文档

我有一台阿里云RDS数据库到期了,考虑到目前业务规模,续费的性价比太低,不如在自己的ECS云服务器上装MySQL再把数据迁移过来。为了避免数据文件迁移时产生兼容性问题,要尽量保证自建MySQL跟RDS上的MySQL的主版本保持一致。
我的RDS上MySQL是5.6版本,而Mysql Yum仓库默认已经升级到8.0版本了,在Yum安装前需要做一些额外设置。

添加MySQL Yum源

首先,从 MySQL官方Yum仓库选择适合当前CentOS版本的rpm包。

1579442107075

下载到ECS云服务器上。

1
wget -i -c https://dev.mysql.com/get/mysql80-community-release-el7-3.noarch.rpm

添加Yum仓库。

1
sudo rpm -Uvh mysql80-community-release-el7-3.noarch.rpm

设置默认安装版本

查询可安装的MySQL版本:

1
yum repolist all | grep mysql

1579442778319

图中enabled状态的版本为Yum安装时的默认版本。如果默认版本不是5.6,需手工编辑/etc/yum.repos.d/mysql-community.repo文件来调整所需版本的启用状态,比如,要想安装5.6版本,则需要将以下代表5.6版本的代码段的enabled设置为1,同时将其他代码片段的enabled值置0。

1
2
3
4
5
6
7
# Enable to use MySQL 5.6
[mysql56-community]
name=MySQL 5.6 Community Server
baseurl=http://repo.mysql.com/yum/mysql-5.6-community/el/7/$basearch/
enabled=1
gpgcheck=1
gpgkey=file:///etc/pki/rpm-gpg/RPM-GPG-KEY-mysql

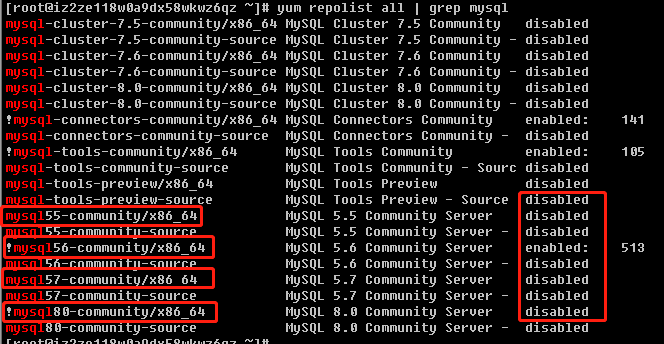
调整完毕后,可重新执行yum repolist all | grep mysql命令复查一下,看默认版本是否符合预期。

执行安装

MySQL默认版本设置检查无误后,执行以下命令即可安装MySQL:

1
sudo yum install mysql-community-server

检查MySQL版本号:

1
mysql -V

我这里输出为:

1
mysql  Ver 14.14 Distrib 5.6.47, for Linux (x86_64) using  EditLine wrapper

版本号为5.6.XX,符合预期,安装成功!

参考资料:

A Quick Guide to Using the MySQL Yum Repository

Docker 基本概念

理解Docker, 必须先搞懂以下三个基本概念:

  • 镜像(Image): 相当于一套root文件系统。
  • 容器(Container): 容器是镜像运行的实体,实际上就是一个普通进程。
  • 仓库(Repository): 存储Docker镜像的中心仓库。比如Docker Hub就是公共的镜像仓库。

容器和镜像的关系类似于面向对象语言的类和实例。

Docker 结构图

Docker采用C/S模式管理远程Docker容器。
Docker容器可被创建、启动、停止、删除、暂停。
Docker容器通过Docker镜像来创建。

Docker运行结构图

用Hexo写Blog文章时,经常需要引用自己的另一篇文章,如何做呢?
可以使用Hexo自带的post_link标签。用法如下:

1
{% post_link url_slug show_title %}

其中,url_slug表示Hexo项目source/_posts目录中markdown文件的名字。比如,我有一篇Blog 使用netlify自动发布hexo博客, 它对应的markdown文件是hexo-with-netlify.md, 则url_slug就是hexo-with-netlify
show_title表示你想要在这里显示给用户看的文章标题,可以不用跟原博客标题保持一致。
拿刚刚这篇文章来说,我在引用它时,需要输入:

1
{% post_link hexo-with-netlify 使用netlify自动发布hexo博客 %}

Shiro是什么?

Shiro是Java领域一个开源安全框架,可以为应用程序提供全面的安全管理服务,功能包括但不限于身份认证、授权、Session管理、加密等。Shiro目前隶属于Apache Software Foundation,其主要竞争对手是Spring Security。相对于Spring Security, Shiro更加简单轻便,适合入门使用。

Shiro能做什么?

Shiro的核心功能可以用下图表示:

Shiro核心功能

从上图可知,Shiro提供以下四个核心功能:

  1. 身份认证: 用户身份认证,通常指用户登陆
  2. 授权:即权限验证,处理访问控制
  3. Session管理
  4. 加密服务
    除了上述四个核心功能外,Shiro还针对不同应用环境提供额外的Feature来简化应用集成:
  5. Web支持
  6. Cache
  7. 并发
  8. 测试
  9. Run as
  10. Remeber me

Shiro适用于哪些领域?

Shiro即可应用于JavaSE环境,用于一般Java程序开发,也适用于JavaEE环境,用于大规模企业级Java应用开发。

Shiro是如何设计的?

读书时我习惯先读读作者自序,来了解作者写书时面临的问题以及想要传达给读者的意图。同样的,学习一个新的框架,也可以先花点时间看看框架的历史、设计目标和核心概念。

(未完待续)

Shiro极简史

Shiro诞生(2020年)已经有17岁了。

(未完待续)

Shiro的核心概念

(未完待续)

Shiro的技术架构

(未完待续)

IOC - 一种编程思想

定义 (Inversion of Control)

对象把对其他对象的控制权交给第三方容器(比如Spring),由第三方容器来统一管理对象的生命周期,提供所需的依赖。
控制权:创建、销毁

IOC VS DI

  • 思想 VS 实现方式

处理依赖的第三种方法

假定A依赖B,如何处理依赖关系:
方法1. 原始做法new B()

1
2
3
4
5
6
7
8
9
10
class B {
public void doSomeThing() {}
}

class A {
public doSomeThing() {
B b = new B();
b.doSomeThing();
}
}

方法2. 简单工厂等创造器模式

1
2
3
4
5
6
7
8
9
10
11
12
13
14
15
16
17
18
19
20
21
22
23
24
25
26
interface IB {
void doSomeThing();
}

class B1 implements IB {}
class B2 implements IB {}
class B3 implements IB {}

class BFactory {
public static IB newB(int type) {
if (type == 1) {
return new B1();
} else if (type == 2) {
return new B2();
} else {
return new B3();
}
}
}

class A {
public doSomeThing() {
IB b = BFactory.newB(1);
b.doSomeThing();
}
}

方法3. 依赖注入

1
2
3
4
5
6
7
8
9
10
11
12
class B {
public void doSomeThing() {}
}

class A {
@Autowired
private B b;

public doSomeThing() {
b.doSomeThing();
}
}

Spring 两大核心思想之一

  • IOC
  • AOP

DI - IOC的实现方式

Spring的DI机制降低了业务对象替换的复杂性,提高了组件之间的解耦。

Spring 实现依赖注入的两种方式

  • 属性 setter 方法注入
  • 有参构造函数注入

IOC 容器 - 对象的超级工厂

IOC 容器主要作用

  • 对象的实例化、组装和管理 (instantiate、assembly、manage)
  • 为对象注入依赖 (Dependency Injection)

Spring Core 就是一个IOC容器

在Spring体系结构中,Spring Core牢牢占据C位。
Spring核心容器

Spring容器抽象视图
Spring容器抽象视图

Spring如何实现IOC容器

对外接口

  • 定义和注册bean
  • 获取bean

核心概念

  • Bean - Spring容器管理的Java对象。
  • BeanFactory - 专门用来生成和获取Bean的接口。
  • ApplicationContext - Spring IOC容器的对外代表(接口)。
  • BeanDefination - 存储Bean定义的接口。
  • BeanRegistry - Bean的注册中心。

这里的BeanDefination接口就是xml配置文件中的标签在Spring中的表示形式。

Spring提供的两种IOC容器

  • BeanFactory - org.springframework.beans.factory.BeanFactory
    管理Bean的超级工厂。
  • ApplicationContext - org.springframework.context.ApplicationContext
    通过继承和组合的方式对BeanFactory做的一层封装。除了具备BeanFactory的能力外,还要负责环境配置管理、生命周期管理、复杂的初始化操作。

BeanFactory和ApplicationContext的关系

BeanFactory和ApplicationContext的关系
还又一个StaticListableBeanFactory。

Spring官方文档的对两者关系的简短表述:

1
In short, the BeanFactory provides the configuration framework and basic functionality, and the ApplicationContext adds more enterprise-specific functionality. The ApplicationContext is a complete superset of the BeanFactory and is used exclusively in this chapter in descriptions of Spring’s IoC container

ApplicationContext的继承结构

ApplicationContext继承结构

Bean的定义

bean的属性列表
Bean标签的属性列表
bean的三种定义方式

  • xml文件中的bean标签
  • 注解 + 扫描 ComponentScan
  • 定义Configuration类,在类中提供 @Bean 方法

xml形式的定义

1
2
3
4
5
6
7
8
9
10
11
12
13
<bean id="exampleBean" name="name1, name2, name3"  class="com.javadoop.ExampleBean"
scope="singleton" lazy-init="true" init-method="init" destroy-method="cleanup">
<!-- 可以用下面三种形式指定构造参数 -->
<constructor-arg type="int" value="7500000"/>
<constructor-arg name="years" value="7500000"/>
<constructor-arg index="0" value="7500000"/>
<!-- property 的几种情况 -->
<property name="beanOne">
<ref bean="anotherExampleBean"/>
</property>
<property name="beanTwo" ref="yetAnotherBean"/>
<property name="integerProperty" value="1"/>
</bean>

注解形式的定义 + 注解扫描

1
2
3
4
5
6
7
8
9
10
11
12
13
14
15
16
17
@Controller
public class EmployeeController {
@Autowired
private EmployeeDao employeeDao;

public String index() {
return "Hello from Spring!";
}
}

@SpringBootApplication
@ComponentScan(basePackages = "com.company.app")
public class MySpringBootApp {
public static void main(String[] args) {
ApplicationContext context = SpringApplication.run(MySpringBootApp.class, args);
}
}

bean定义、注册、获取的示例代码

1
2
3
4
5
6
7
8
9
10
11
12
13
14
15
16
17
18
19
20
21
22
23
24
25
26
27
28
29
30
31
32
33
34
35
36
37
38
// 新建一个工厂
DefaultListableBeanFactory factory = new DefaultListableBeanFactory();

// 新建一个 bean definition
GenericBeanDefinition beanDefinition = (GenericBeanDefinition) BeanDefinitionBuilder
.genericBeanDefinition(SomeService.class)
.setAutowireMode(GenericBeanDefinition.AUTOWIRE_BY_TYPE)
.getBeanDefinition();

// 注册到工厂
factory.registerBeanDefinition("someService", beanDefinition);

// 自己定义一个 bean post processor. 作用是在 bean 初始化之后, 判断这个 bean 如果实现了 ApplicationContextAware 接口, 就把 context 注册进去..(先不要管 context 哪来的...例子嘛)
factory.addBeanPostProcessor(new BeanPostProcessor() {
@Override
public Object postProcessBeforeInitialization(Object bean, String beanName) throws BeansException {
return bean;
}

@Override
public Object postProcessAfterInitialization(Object bean, String beanName) throws BeansException {
if (bean instanceof ApplicationContextAware) {
GenericApplicationContext context = new GenericApplicationContext(factory);
((ApplicationContextAware) bean).setApplicationContext(context);
}
return bean;
}
});

// 再注册一个 bean post processor: AutowiredAnnotationBeanPostProcessor. 作用是搜索这个 bean 中的 @Autowired 注解, 生成注入依赖的信息.
AutowiredAnnotationBeanPostProcessor autowiredAnnotationBeanPostProcessor = new AutowiredAnnotationBeanPostProcessor();
autowiredAnnotationBeanPostProcessor.setBeanFactory(factory);
factory.addBeanPostProcessor(autowiredAnnotationBeanPostProcessor);

// getBean() 时, 初始化
SomeService SomeService = factory.getBean("someService",SomeService.class);
SomeService.doSomething();

Spring Core中模块之间的依赖关系图

Spring核心容器模块之间的依赖关系

核心实现类

最简单的BeanFactory:StaticListableBeanFactory

1
2
3
4
5
6
7
8
9
10
11
12
13
14
15
16
17
18
19
20
21
22
23
24
25
26
27
28
29
30
31
32
33
34
35
36
37
38
39
40
41
public class StaticListableBeanFactory implements ListableBeanFactory {
private final Map<String, Object> beans;

public StaticListableBeanFactory() {
this.beans = new LinkedHashMap();
}

public StaticListableBeanFactory(Map<String, Object> beans) {
Assert.notNull(beans, "Beans Map must not be null");
this.beans = beans;
}

public void addBean(String name, Object bean) {
this.beans.put(name, bean);
}

public Object getBean(String name) throws BeansException {
String beanName = BeanFactoryUtils.transformedBeanName(name);
Object bean = this.beans.get(beanName);
if (bean == null) {
throw new NoSuchBeanDefinitionException(beanName, "Defined beans are [" + StringUtils.collectionToCommaDelimitedString(this.beans.keySet()) + "]");
} else if (BeanFactoryUtils.isFactoryDereference(name) && !(bean instanceof FactoryBean)) {
throw new BeanIsNotAFactoryException(beanName, bean.getClass());
} else if (bean instanceof FactoryBean && !BeanFactoryUtils.isFactoryDereference(name)) {
try {
Object exposedObject = ((FactoryBean)bean).getObject();
if (exposedObject == null) {
throw new BeanCreationException(beanName, "FactoryBean exposed null object");
} else {
return exposedObject;
}
} catch (Exception var5) {
throw new BeanCreationException(beanName, "FactoryBean threw exception on object creation", var5);
}
} else {
return bean;
}
}

...
}

单例Bean对象的注册表类:

1
2
3
4
5
6
7
8
9
10
11
12
13
14
15
16
17
18
19
20
21
22
23
24
25
26
27
28
29
30
31
32
33
34
35
36
37
38
39
40
41
42
43
public class DefaultSingletonBeanRegistry extends SimpleAliasRegistry implements SingletonBeanRegistry {

/** Cache of singleton objects: bean name to bean instance. */
private final Map<String, Object> singletonObjects = new ConcurrentHashMap<>(256);

/** Cache of singleton factories: bean name to ObjectFactory. */
private final Map<String, ObjectFactory<?>> singletonFactories = new HashMap<>(16);

/** Cache of early singleton objects: bean name to bean instance. */
private final Map<String, Object> earlySingletonObjects = new HashMap<>(16);

/** Set of registered singletons, containing the bean names in registration order. */
private final Set<String> registeredSingletons = new LinkedHashSet<>(256);

/** Names of beans that are currently in creation. */
private final Set<String> singletonsCurrentlyInCreation =
Collections.newSetFromMap(new ConcurrentHashMap<>(16));

/** Names of beans currently excluded from in creation checks. */
private final Set<String> inCreationCheckExclusions =
Collections.newSetFromMap(new ConcurrentHashMap<>(16));

/** List of suppressed Exceptions, available for associating related causes. */
@Nullable
private Set<Exception> suppressedExceptions;

/** Flag that indicates whether we're currently within destroySingletons. */
private boolean singletonsCurrentlyInDestruction = false;

/** Disposable bean instances: bean name to disposable instance. */
private final Map<String, Object> disposableBeans = new LinkedHashMap<>();

/** Map between containing bean names: bean name to Set of bean names that the bean contains. */
private final Map<String, Set<String>> containedBeanMap = new ConcurrentHashMap<>(16);

/** Map between dependent bean names: bean name to Set of dependent bean names. */
private final Map<String, Set<String>> dependentBeanMap = new ConcurrentHashMap<>(64);

/** Map between depending bean names: bean name to Set of bean names for the bean's dependencies. */
private final Map<String, Set<String>> dependenciesForBeanMap = new ConcurrentHashMap<>(64);

...
}

Spring Bean实例的创建

1
2
3
4
5
6
7
8
9
10
11
12
13
14
15
// org.springframework.beans.factory.support.AbstractAutowireCapableBeanFactory 
protected Object doCreateBean(final String beanName, final RootBeanDefinition mbd, final @Nullable Object[] args)
throws BeanCreationException {

// Instantiate the bean.
...
instanceWrapper = createBeanInstance(beanName, mbd, args); // line 555
...
// inject dependencies for bean properties
populateBean(beanName, mbd, instanceWrapper); // line 592
exposedObject = initializeBean(beanName, exposedObject, mbd);
...

return exposedObject;
}

createBeanInstance方法如下:

1
2
3
4
5
6
7
8
9
10
11
12
13
14
15
16
17
18
19
20
21
22
23
24
25
26
27
28
29
30
31
32
33
34
35
36
37
// org.springframework.beans.factory.support.AbstractAutowireCapableBeanFactory line 759
protected BeanWrapper createBeanInstance(String beanName, RootBeanDefinition mbd, @Nullable Object[] args) {
Class<?> beanClass = this.resolveBeanClass(mbd, beanName, new Class[0]);
if (beanClass != null && !Modifier.isPublic(beanClass.getModifiers()) && !mbd.isNonPublicAccessAllowed()) {
throw new BeanCreationException(mbd.getResourceDescription(), beanName, "Bean class isn't public, and non-public access not allowed: " + beanClass.getName());
} else {
Supplier<?> instanceSupplier = mbd.getInstanceSupplier();
if (instanceSupplier != null) {
return this.obtainFromSupplier(instanceSupplier, beanName);
} else if (mbd.getFactoryMethodName() != null) {
return this.instantiateUsingFactoryMethod(beanName, mbd, args);
} else {
boolean resolved = false;
boolean autowireNecessary = false;
if (args == null) {
synchronized(mbd.constructorArgumentLock) {
if (mbd.resolvedConstructorOrFactoryMethod != null) {
resolved = true;
autowireNecessary = mbd.constructorArgumentsResolved;
}
}
}

if (resolved) {
return autowireNecessary ? this.autowireConstructor(beanName, mbd, (Constructor[])null, (Object[])null) : this.instantiateBean(beanName, mbd);
} else {
Constructor<?>[] ctors = this.determineConstructorsFromBeanPostProcessors(beanClass, beanName);
if (ctors == null && mbd.getResolvedAutowireMode() != 3 && !mbd.hasConstructorArgumentValues() && ObjectUtils.isEmpty(args)) {
ctors = mbd.getPreferredConstructors();
return ctors != null ? this.autowireConstructor(beanName, mbd, ctors, (Object[])null) : this.instantiateBean(beanName, mbd);
} else {
return this.autowireConstructor(beanName, mbd, ctors, args);
}
}
}
}
}

经过多次弯弯绕之后,终于来到了最终的实例化方法:

1
2
3
4
5
6
7
8
9
10
11
12
13
14
15
16
17
// org.springframework.beans.BeanUtils  line 49
public static <T> T instantiateClass(Constructor<T> ctor, Object... args) throws BeanInstantiationException {
Assert.notNull(ctor, "Constructor must not be null");

try {
ReflectionUtils.makeAccessible(ctor);
return KotlinDetector.isKotlinReflectPresent() && KotlinDetector.isKotlinType(ctor.getDeclaringClass()) ? BeanUtils.KotlinDelegate.instantiateClass(ctor, args) : ctor.newInstance(args);
} catch (InstantiationException var3) {
throw new BeanInstantiationException(ctor, "Is it an abstract class?", var3);
} catch (IllegalAccessException var4) {
throw new BeanInstantiationException(ctor, "Is the constructor accessible?", var4);
} catch (IllegalArgumentException var5) {
throw new BeanInstantiationException(ctor, "Illegal arguments for constructor", var5);
} catch (InvocationTargetException var6) {
throw new BeanInstantiationException(ctor, "Constructor threw exception", var6.getTargetException());
}
}

可见,本质上还是使用反射来获取构造函数,实现对象的实例化的。

Spring Bean的销毁

1
2
3
4
5
6
7
8
9
10
11
12
13
14
15
16
17
18
19
20
21
22
23
24
25
26
/**
* Actually performs context closing: publishes a ContextClosedEvent and
* destroys the singletons in the bean factory of this application context.
* <p>Called by both {@code close()} and a JVM shutdown hook, if any.
* @see org.springframework.context.event.ContextClosedEvent
* @see #destroyBeans()
* @see #close()
* @see #registerShutdownHook()
*/
protected void doClose() {
// Publish shutdown event.
publishEvent(new ContextClosedEvent(this));

// Stop all Lifecycle beans, to avoid delays during individual destruction.
this.lifecycleProcessor.onClose();

// Destroy all cached singletons in the context's BeanFactory.
destroyBeans();

// Close the state of this context itself.
closeBeanFactory();

// Let subclasses do some final clean-up if they wish...
onClose();
}
}

在各种流行的Java开发框架比如Spring boot中,大量使用了注解Annotation来做自动化配置。学习Spring有必要先了解一下注解。
注解是从Java 1.5版本开始加入到Java语言中的,因其便利性逐渐被Java开发者广泛接受。那么,注解到底是什么东西呢?

注解的定义

就个人理解,注解就是贴在程序源码上的语法标签,为编译器和JVM提供关于被贴代码(类、方法、构造函数、变量、参数等等)的一些辅助信息,这些信息可以帮助编译器做一些额外处理(比如@Overrride注解告诉编译器需要检查是否真的做了方法覆盖),或者让JVM在加载这段代码时做必要的前置工作(比如@DependsOn注解告知JVM需要先加载所依赖的类)。
我看到的比较靠谱的注解定义在这里

元注解

Java语言提供如下元注解:

  • @Override
    典型的标记类注解,作用是明确告知编译器该方法Override了基类、接口、Object等的共有方法。编译器将对该注解标记的方法进行检查,若发现不符合Override定义,会直接报错。
  • @Deprecated
    标记类注解,标记方法已被弃用。如果有人继续使用该方法,编译器将抛出警告⚠️。
  • @SuppressWarnings
    让编译器忽略指定的一种或多种编译器警告。
  • @Retention
    指定被它标记的注解的存储位置,从而决定它的生命周期。比如RetentionPolicy.SOURCE 定义注解只存储在源码中,不会被编译进.class文件,那么注解的生命周期也就被限制在源码编译成字节码之前。 默认值为RetentionPolicy.CLASS
  • @Target
    指定被它标记的注解的作用目标。目前取值有TYPE,FIELD,METHOD,PARAMETER,CONSTRUCTOR,LOCAL_VARIABLE,ANNOTATION_TYPE,PACKAGE,TYPE_PARAMETER,TYPE_USE
  • @Documented
    标记文档生成工具在生成的文档中包含被它标记的注解。
  • @Inherited
    定义Java子类在继承父类时,同时继承拥有这个元注解的注解。注意,只针对普通类之间的继承,接口继承、接口实现时不会继承注解。
  • @Repeatable
    定义注解可以多次重复应用于相同的目标Target。
  • @Native
    标记目标常量可以被native代码引用。
  • @FunctionalInterface
    该注解用于标记函数式接口。加上该注解后,若编写的接口不符合函数式接口的定义,编译器将报错。
  • @SafeVarargs
    针对可变参数构造函数或方法生效,让编译器忽略unchecked警告⚠️。

自定义注解

我们可以通过组合现有注解的方式来定义新的注解。注解的定义语法如下:

1
2
3
[Access Specifier] @interface <AnnotationName> {
DataType <Method Name>() [default Value];
}

参照以上语法和现有元注解,我们可以自定义如下新注解:

1
2
3
4
5
@Target(ElementType.TYPE)
@Retention(RetentionPolicy.RUNTIME)
public @interface HelloAnnotation {
String value() default "Hi";
}

然后,可以像其他注解一样使用:

1
2
3
4
5
6
7
@HelloAnnotation("Hello")
public class MyApplication {
public static void main(String[] args) {
HelloAnnotation annotation = MyApplication.class.getAnnotation(HelloAnnotation.class);
System.out.println(annotation.value());
}
}

使用hexo博客发布一篇博文的流程为:

1
2
hexo n "a new post"
hexo g -d

以上操作将博文的.md文件编译成.html文件,连同资源文件一起打包发布到网站空间里。对于.md源文件,默认是没有版本控制的。 为了防止丢失、误删,以及使用多个电脑管理博客,我们需要为hexo工程建一个单独的git仓库,并同步到github、coding等托管平台。实际使用中,除了上面列出来的两条命令外,还需要执行以下操作:

1
2
3
git add .
git commit -m "add a new post, bla bla bla"
git push

我正在尝试一种新方式,使用netlify来做持续集成和自动部署。
在source/_posts目录下新建一个.md文件用来写博文,可以用任何markdown编辑器来写,写完后直接add commit push即可。具体命令为:

1
2
3
git add .
git commit -m "add a new post, bla bla bla"
git push

这种新方式非常灵活,不需要hexo命令,也就不需要在每台电脑上安装hexo以及所依赖的node.js, npm等。只需要电脑上有git即可操作。

netlify配置步骤,可参考官方blog:A Step-by-Step Guide: Hexo on Netlify

自从用上Mac,Homebrew就成了一个绕不开的工具。Homebrew是Mac的软件包管理工具,作用相当于CentOS上的yum。Mac上的好多软件,都需要用Homebrew安装。基本上使用brew install <packageName>或者brew cask install <packageName>就能一步到位装好软件了。但是头疼的是,我在运行brew install的时候,经常会提示Updating Homebrew...,然后卡住好几分钟,也不知道后台实际上在干些什么,体验很不好。截图如下:
brew install 时卡住了。。。

一般遇到这种情况,直接使用control + C快捷键就可以打断更新,直接进入后续的install环节。
control + C打断更新
control + C一时爽,可是如果每次都要这样操作,却有违俺样的美学。所谓知其然,还要知其所以然。于是收集各种网上资料,并结合自己的实践测试了一下,对卡顿原因有了一定的了解。

问题分析

检查Homebrew脚本代码 /usr/local/Homebrew/Library/Homebrew/brew.sh可以发现,Homebrew在执行install操作时,默认会先去更新自己。

而更新操作,实际上是调用git pull从Homebrew位于github的官方镜像仓库拉取最新的版本到本地仓库(即Homebrew的安装目录)。如果github被墙或者访问速度太慢,就会出现卡顿现象。
check official repository

可以使用brew update --verbose测试一下实际的更新速度,感受一下实际的卡顿:

解决方法:

弄明白原因后,就可以对症下药了。

总的来说,要解决这个卡顿问题,有三种方法: 一是简单粗暴直接禁用brew update,二是使用国内镜像源,三是延长update的检查时间间隔。

方法1: 禁用brew update

设置环境变量HOMEBREW_NO_AUTO_UPDATE即可。
这里需要区分一下shell种类,可以使用echo $SHELL命令查看。
针对/bin/zsh, 执行如下命令:

1
2
echo 'export HOMEBREW_NO_AUTO_UPDATE=true' >> ~/.zshrc
source ~/.zshrc

针对/bin/bash, 执行如下命令:

1
2
echo 'export HOMEBREW_NO_AUTO_UPDATE=true' >> ~/.bash_profile
source ~/.bash_profile

禁用之后,如果需要更新brew包,可以执行如下命令:

1
2
brew update && brew upgrade && brew cleanup ; say brew updated
brew update && brew upgrade brew-cask && brew cleanup ; say brew-cask updated

方法2: 更换更快的镜像源

可选的镜像源有:

  • 清华:git://mirrors.tuna.tsinghua.edu.cn/homebrew.git
  • 中科大:http://mirrors.ustc.edu.cn/homebrew.git
  • Coding.net:https://git.coding.net/homebrew/homebrew.git
    这里我使用了清华的镜像源,操作命令如下:
    1
    2
    3
    4
    5
    git -C "$(brew --repo)" remote set-url origin https://mirrors.tuna.tsinghua.edu.cn/git/homebrew/brew.git

    git -C "$(brew --repo homebrew/core)" remote set-url origin https://mirrors.tuna.tsinghua.edu.cn/git/homebrew/homebrew-core.git

    git -C "$(brew --repo homebrew/cask)" remote set-url origin https://mirrors.tuna.tsinghua.edu.cn/git/homebrew/homebrew-cask.git
    顺便也可以设置一下Homebrew二进制预编译包的镜像地址,具体需要通过设置环境变量HOMEBREW_BOTTLE_DOMAIN来实现。这里也需要区分一下shell版本:

如果使用 /bin/zsh, 则执行如下命令:

1
2
echo 'export HOMEBREW_BOTTLE_DOMAIN=https://mirrors.tuna.tsinghua.edu.cn/homebrew-bottles' >> ~/.zshrc
source ~/.zshrc

而如果使用为/bin/bash,则执行如下命令:

1
2
echo 'export HOMEBREW_BOTTLE_DOMAIN=https://mirrors.tuna.tsinghua.edu.cn/homebrew-bottles' >> ~/.bash_profile
source ~/.bash_profile

然后重新执行一下:

1
2
cd $home
brew update

装两个软件试试:
brew_install_test
卡顿有了明显改善。:)

方法3: 延长自动update的检查间隔时间

通过阅读源码或帮助文档manpage,发现可以通过设置环境变量HOMEBREW_AUTO_UPDATE_SECS来控制检查更新的间隔时间。
auto_update_secs_env_var

在近期发布的Homebrew 2.2.0版本,也提到了一个主要更新feature:

这在homebrew/brew的代码中也得到了证实:

update_secs

可见,Homebrew官方自己也认为这个时间设置的太短了没啥意义。

考虑到我们装软件是个低频操作,不会天天装软件,犯不着每次装软件都去检查一次更新。这个环境变量的取值可以设置的大胆一些,比如一个月,或着两周。设置方法跟本文中其他环境变量的方式相同,这里不再赘述。

注意,这种方法只是尽可能延迟检查更新的时间,达到减少更新次数的目的,并不能完全避免卡顿,所以显得比较鸡肋。个人更喜欢第二种方法,更换更快的镜像源。

setup your hexo blog with github pages hosting

install hexo

first, install these two npm packages: hexo-cli, hex-deployer-git

1
2
npm install -g hexo-cli
npm install hexo-deployer-git --save

create a hexo project

create a hexo project with the same name as your github repo

1
hexo init ocre.github.io

create a new post

script
1
hexo new "my first hexo blog"

verify your hexo project:

1
hexo server

and you will get a running hexo site at http://localhost:4000/

create github pages repo

create a new github repoistory named as ‘your_github_username’.github.io

deploy to github

modify git config in _config.yml

script
1
2
3
4
5
6
# Deployment
## Docs: https://hexo.io/docs/deployment.html
deploy:
type: git
repo: git@github.com:ocre/ocre.github.io.git
branch: master

test deploy

script
1
2
hexo generate
hexo deploy

verify it via https://ocre.github.io

Mission Complete!

0%